
This is, I promise, actually a review of the brand-new digital M-meter by popular metering brand KEKS. It is. But, it’s impossible to do a proper review of their newest (and most interesting) offering without starting with a little time travel back to the very beginning of the Leica M line of rangefinder cameras…
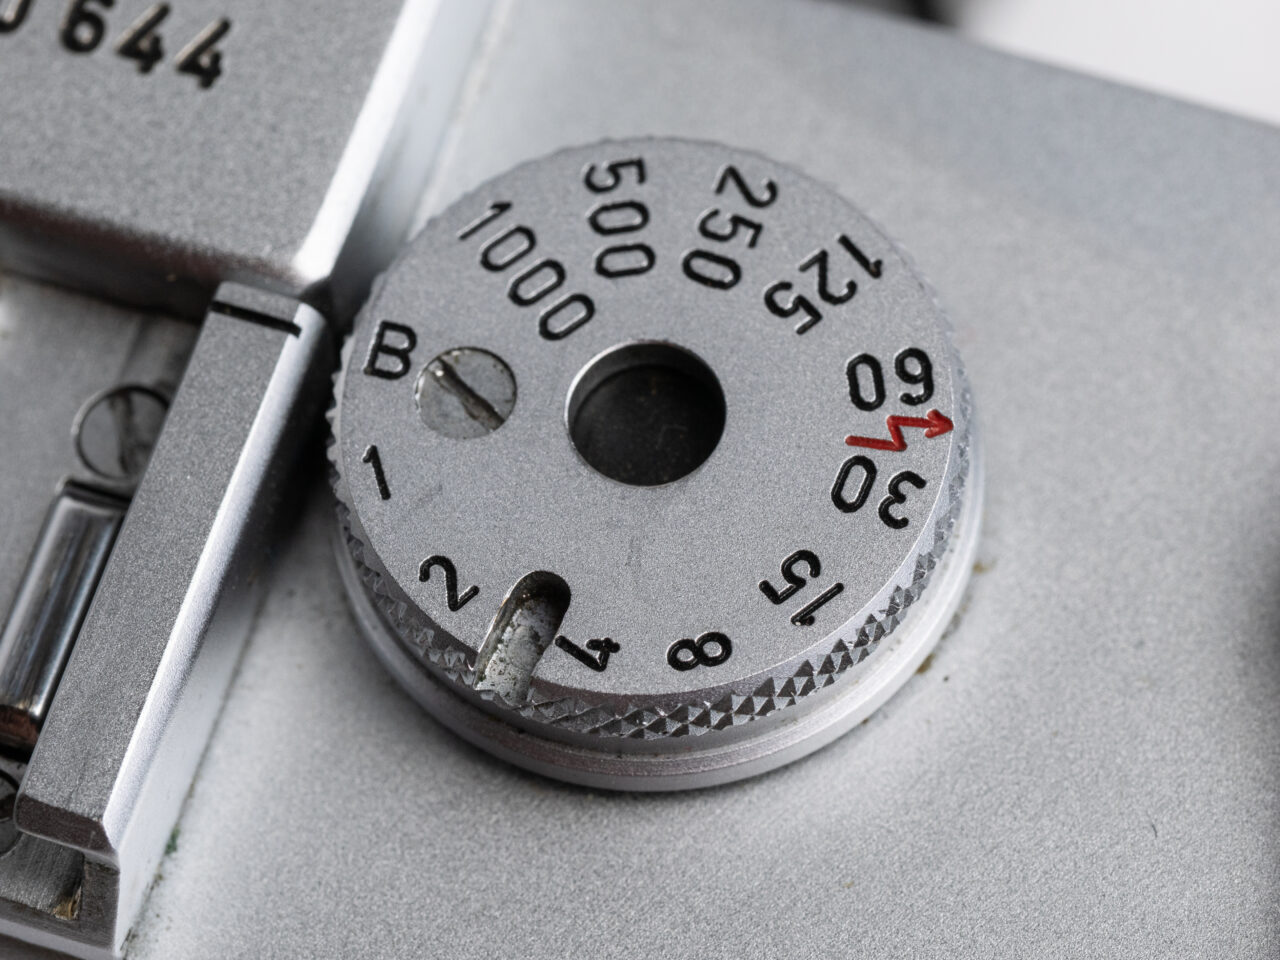
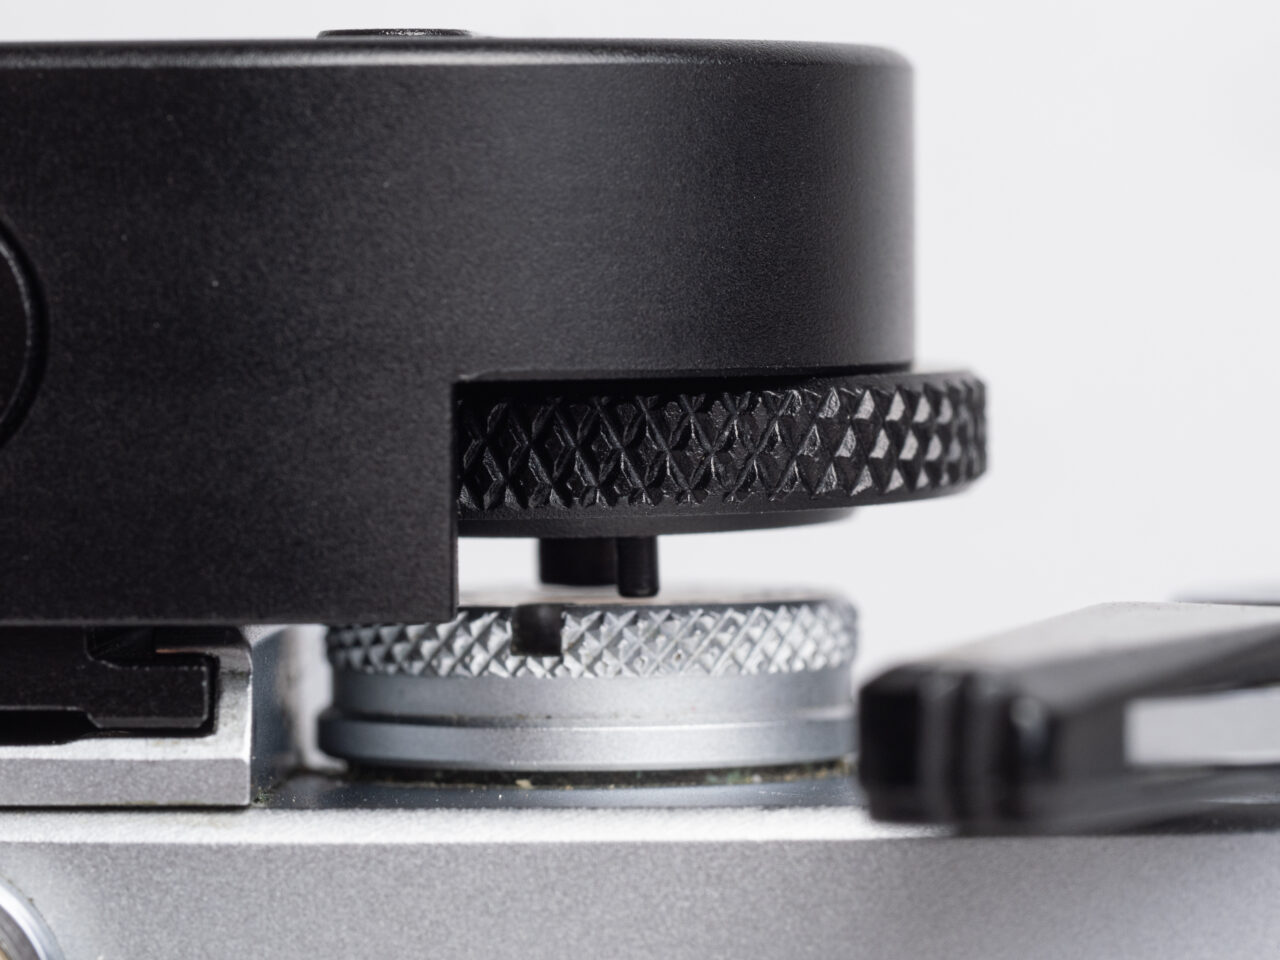
Have you ever noticed this notch on some Leica M shutter speed dials and wondered what it’s for? Well, that notch was for mounting one of the Leica M-series meters; which are now considered historical footnotes by most users but which were actually an essential part of the M system. See, Leica knew that a good, accurate meter was essential for a professional camera kit, and that purchasers of the newly designed M3 would want metering included in the design. But Leica did not trust the electronics of the meter and viewed them as the most likely point of failure (a prediction you can see validated with many M5s and original M6s.) So rather than build the meter in, from the very beginning the M was designed to be partnered with an external (and thus, replaceable) metering unit that automatically coupled to the shutter speed dial—simplifying use and increasing efficiency. The meters were actually made by Mettrawatt, a German company Leica had worked with previously on its Metrophot meters, and who were known for producing well-made, accurate meters.
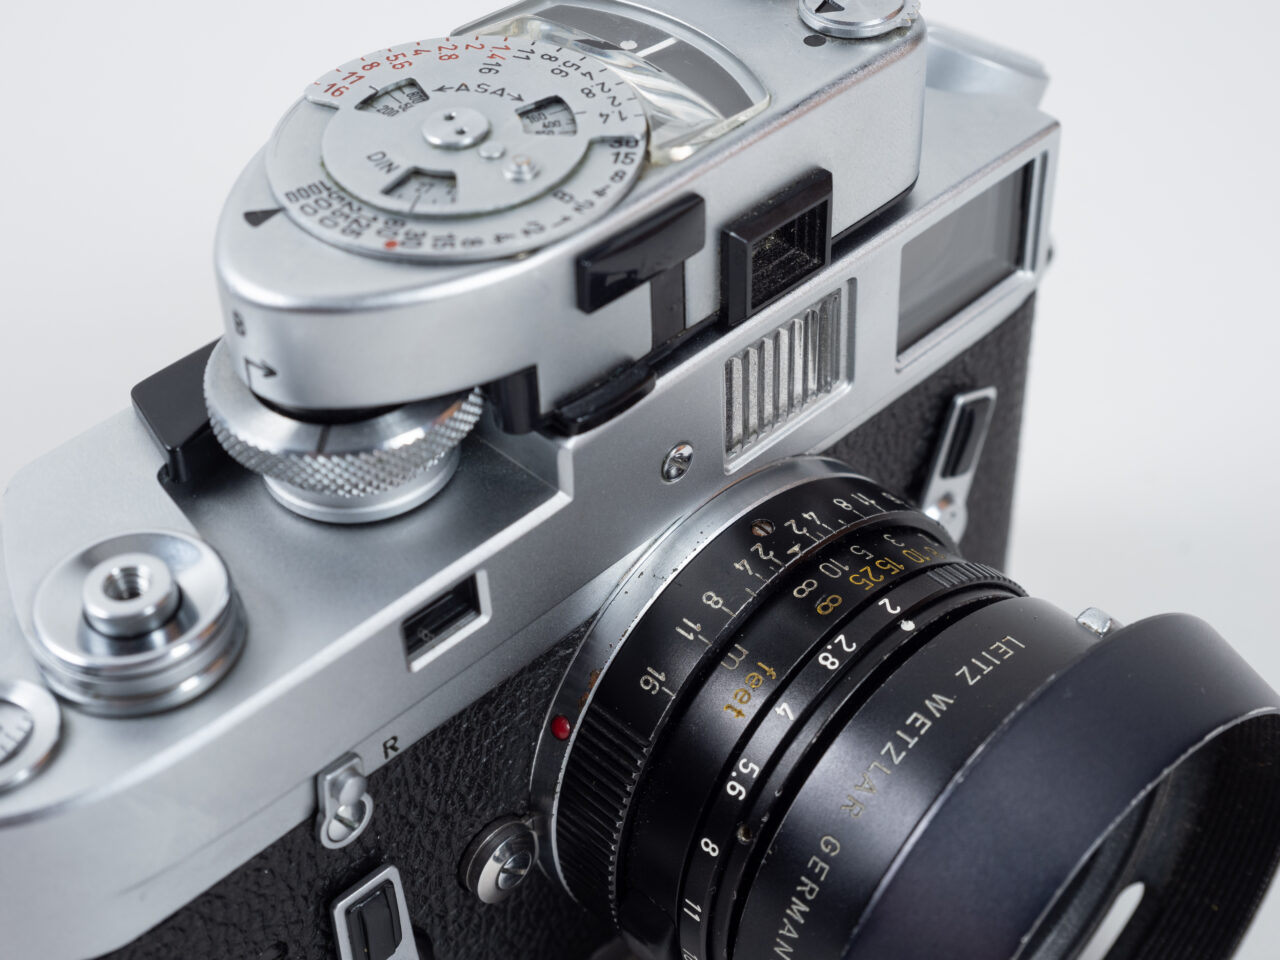
Thus, the M meter was born. Leica would introduce four different models in the short space between 1954 and 1967: the M, MC, MR, and MR-4. The first two were selenium cell meters, the last two were battery-powered CdS units differing only in the placement of the meter activation button (redesigned on the MR-4 to clear the canted rewind lever of the new M4.) The last two, the MR and MR-4, have remained perhaps the pinnacle of on-camera meters ever since.
- Shutter-coupled means one of the two key settings is already set, leaving the user to either set the aperture indicated for the current shutter speed, or to turn the shutter dial until the desired aperture is indicated.
- The larger dial of the meter that couples to the shutter speed dial greatly increases the ergonomics of the M’s shutter dial, allowing for fast shutter speed changes without hardly moving the finger from the shutter release.
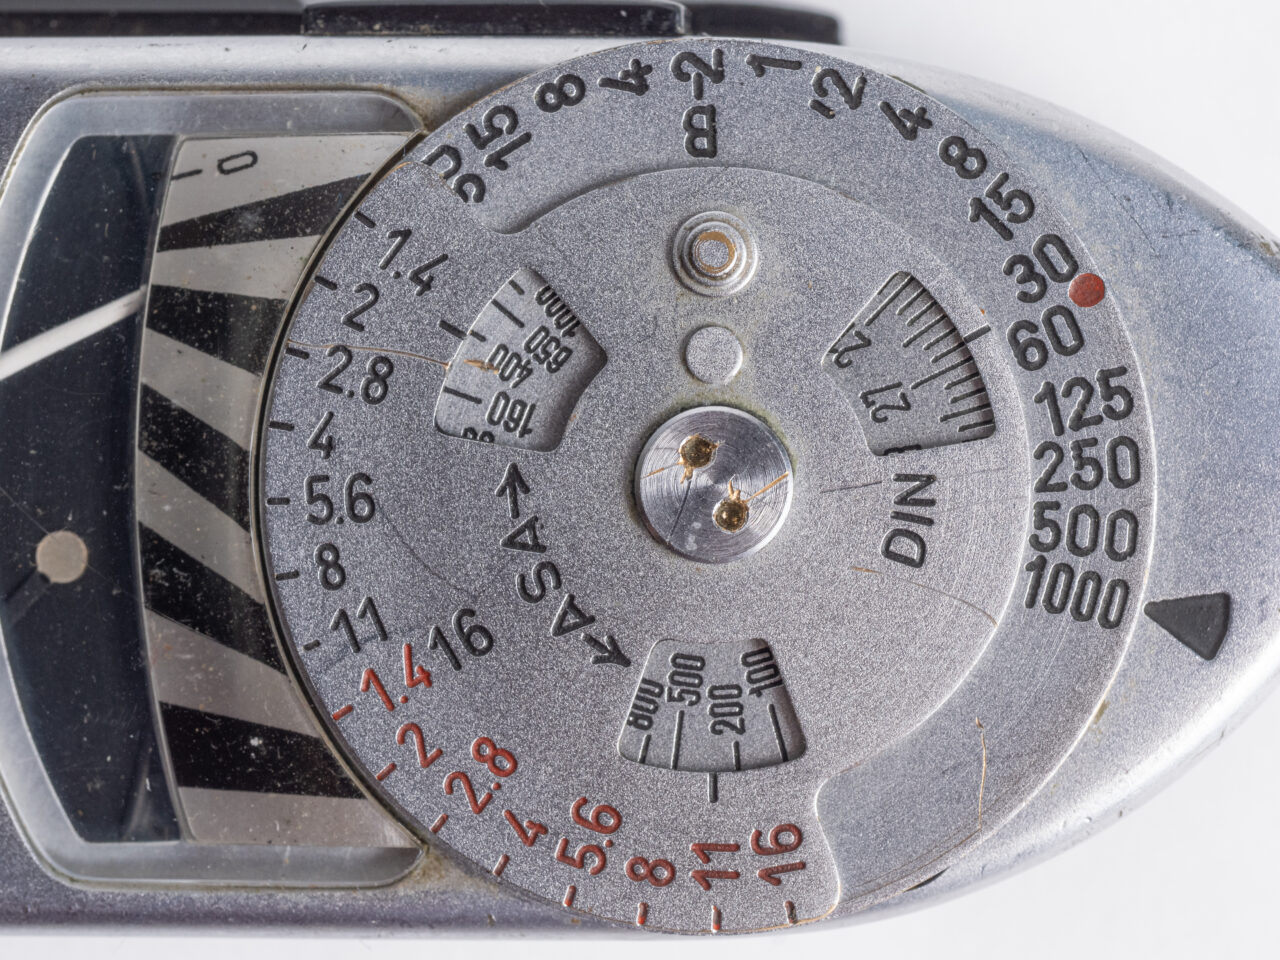
- Between two selectable ranges (roughly “indoors” and “outdoors”) the meter covered a lighting range of EV2 to EV18 at ISO 100.
- Meter-needle remained trapped at the last reading for later reference.
- Quick-glance dials showed the selected shutter speed, metered aperture, and allowed rapid parsing of the relative changes to both available from that starting point.
- A wide marked ISO range of 10-1600, but of course if you can count stops it could also be set to values outside those bounds.
- An unusual semi-spot metering cone roughly equivalent to a 90mm lens, and able to use the 90mm frame lines to judge the metered area regardless of mounted lens.
Additionally, being an on-camera meter (instead of the now more popular in-camera or through-the-lens meter) the M meter offered several advantages for certain types of shooters:
- The meter could be used and all settings made without raising the camera to the eye. (Top-deck LCDs on later cameras were a solution to this offering the best of both, but, no M has ever included one so a moot point here.)
- The metering area did not change based on the mounted lens. No complicated rules as to how big the metering area was, it was always the same. With a little practice and familiarity the meter could be used to read a scene without needing to even use the frame lines.
- And, of course, if the meter died there was no need to send the camera in for service. Just put a new meter on and keep going.
“Someone really oughtta make a new digital update of the MR-4”
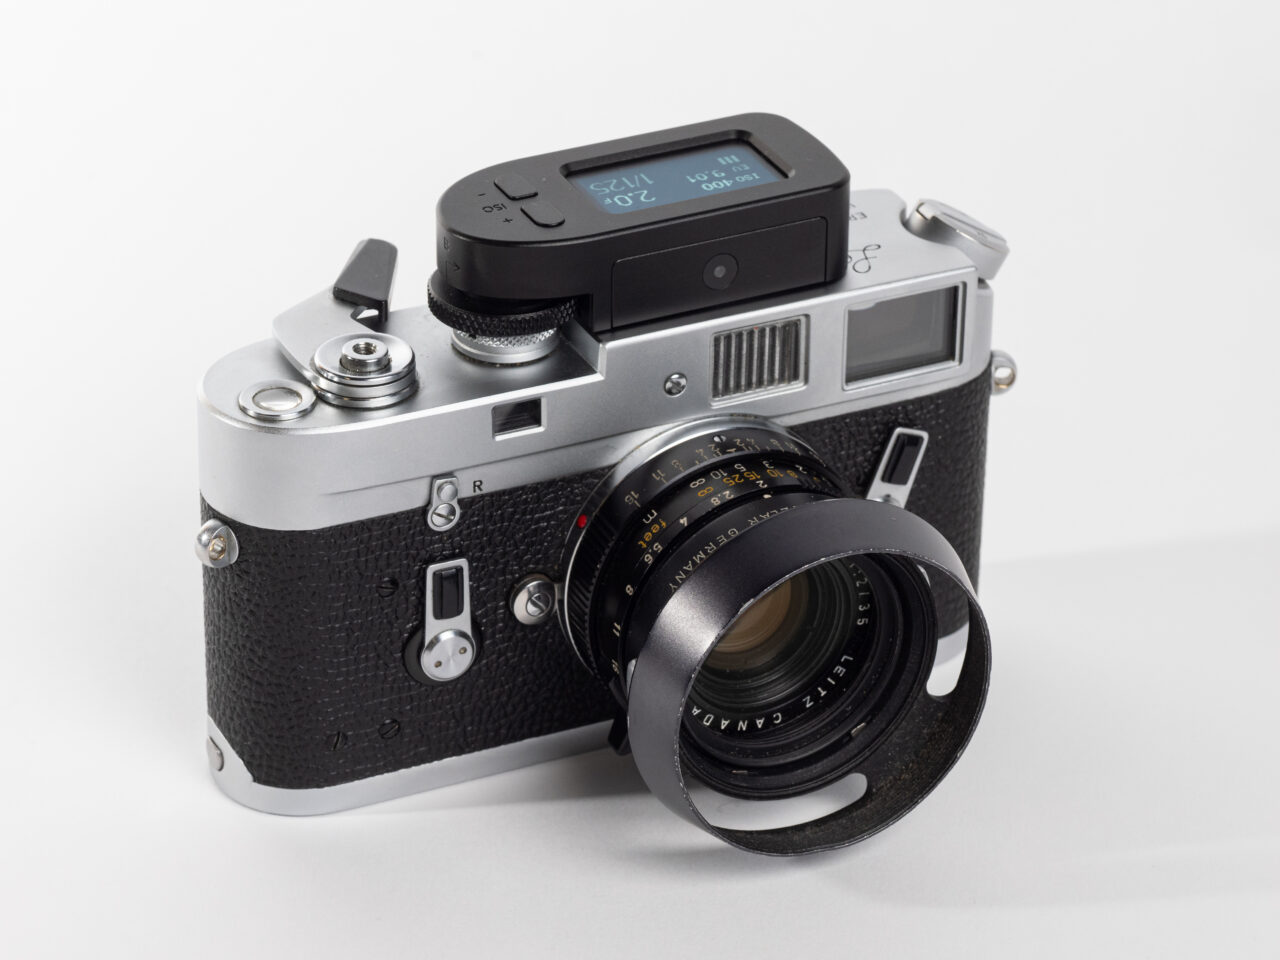
Which finally leads us to the new KEKS M-Meter. Because, as great as the MR and MR-4 meters are let’s be honest: the newest copies are still 38 years old. It’s hard to find working copies, between corroded circuits and crumbling plastic meshing gears. And if you manage to, you’re still stuck using the expensive Wein Cell PX625 replacements for the old mercury batteries. The M meter may be the perfect complement to most M cameras, but, it’s been really hard to seriously recommend to new users (and even harder to get them to believe you.) I’ve been saying for years now that someone should make an updated version, and, well, KEKS surprised me to no end when it announced a new product doing exactly that.

The new KEKS M-meter is the same basic idea as the original M meters: a shutter coupled unit with similar size and design. But, now it’s updated for the millennium with a slew of improvements:
- Modern Vishay VEML7700 digital ambient light sensor.
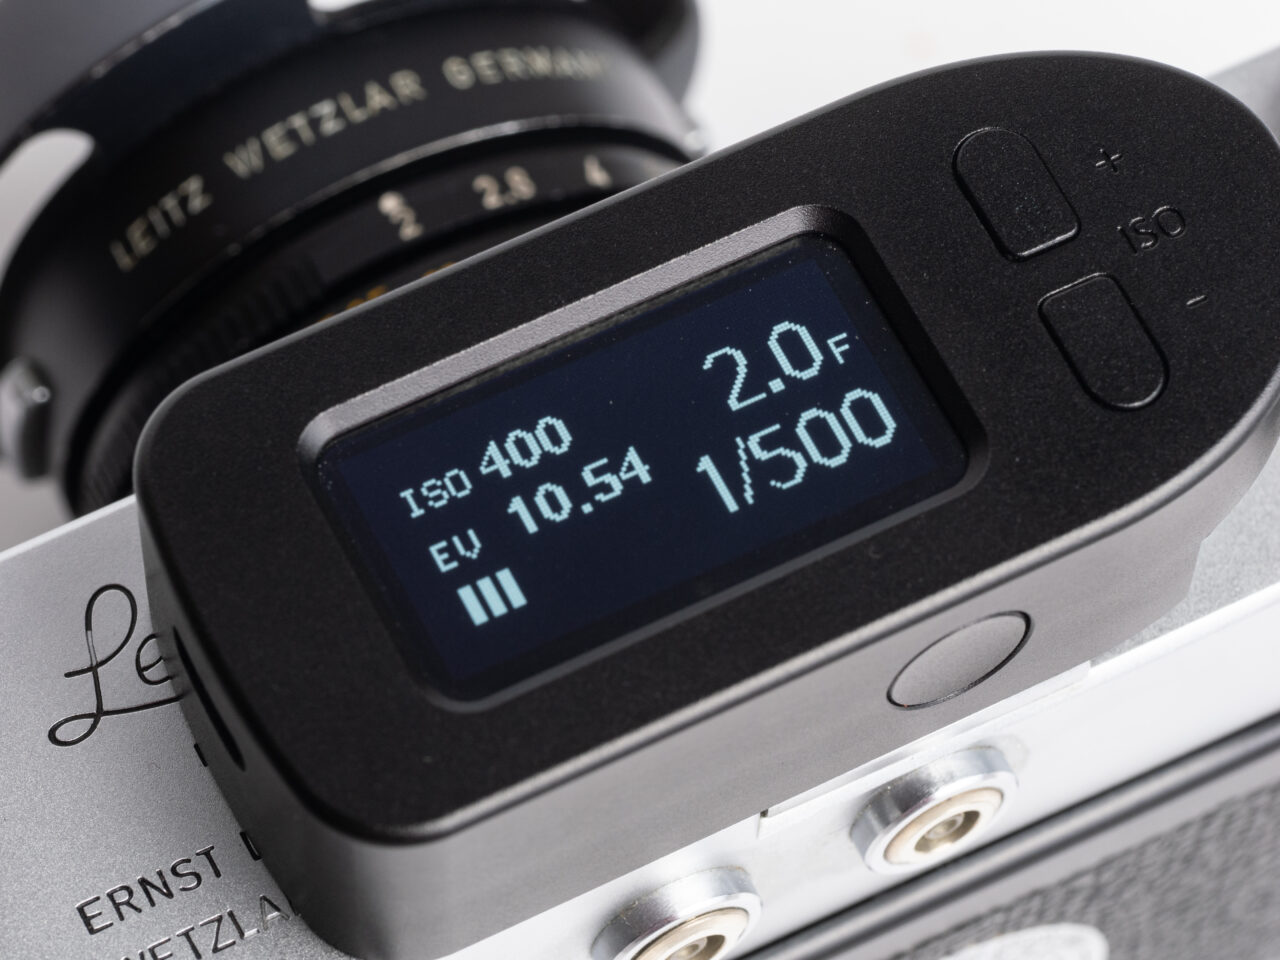
- 1.3” OLED display showing shutter speed, aperture, ISO, EV, EV comp, and remaining battery.
- Built-in rechargeable li-ion battery (which is also easily user-replaced, they claim.)
- Extended ISO range of 6-3200.
- Extended sensitivity range of EV1 to EV20 at ISO 100.
- Aperture ranges from f1 to f128, with selectable 1/3, 1/2, or full-stop units and selectable range limiters
Now that’s how you update a legacy product. Finally a digital meter suited for the Leica M as it was literally designed for. So, how does it hold up?
Mounting
KEKS has done a wonderful job on the build and design of the M-meter. It even mounts with an exact copy of the original coupling system. As with the originals, there’s a simple trick to mounting it that a lot of people don’t seem to know but which will keep you from trashing your top plate and shutter dial trying to get it on.
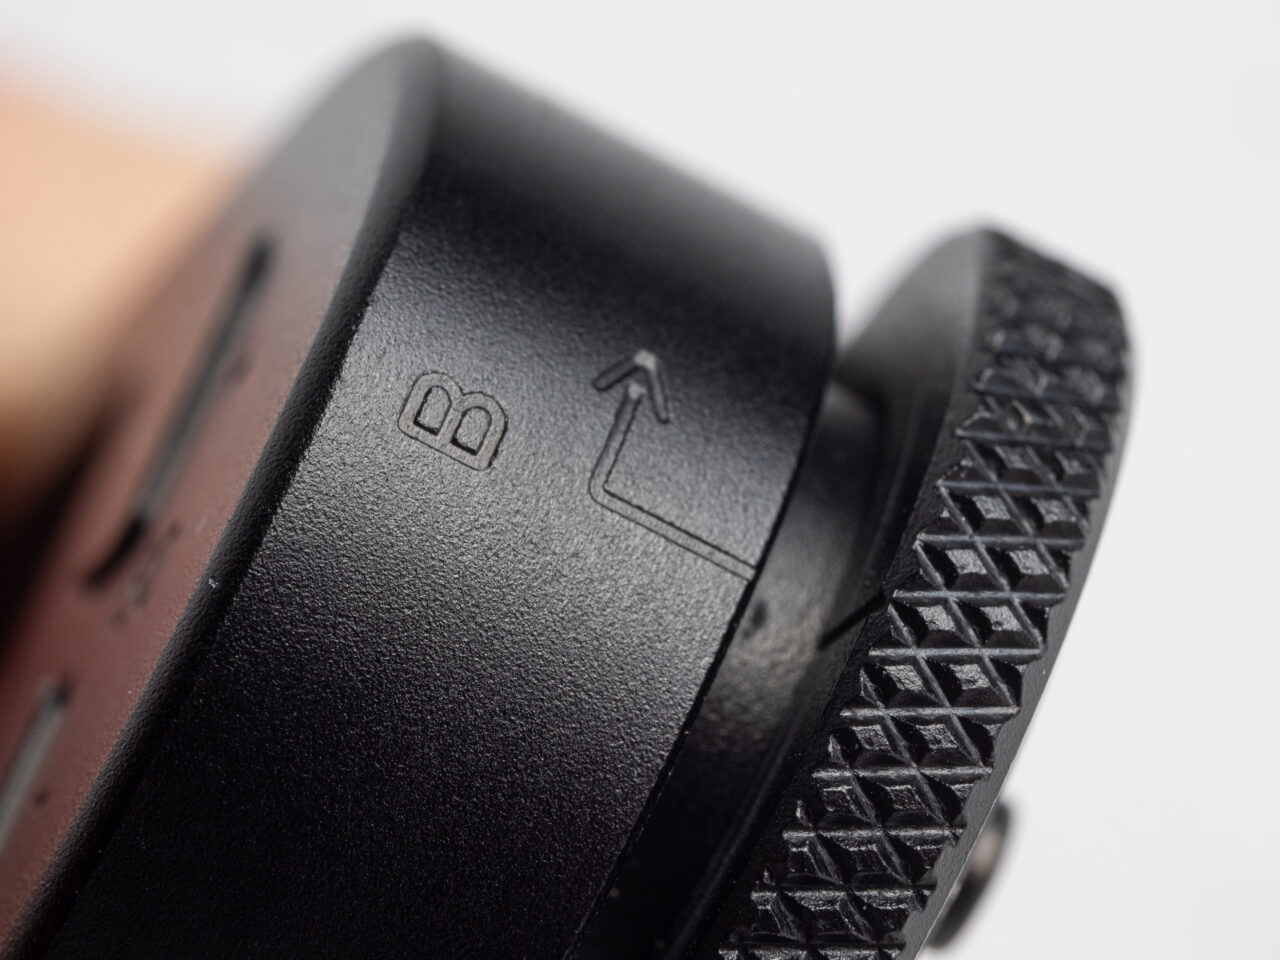
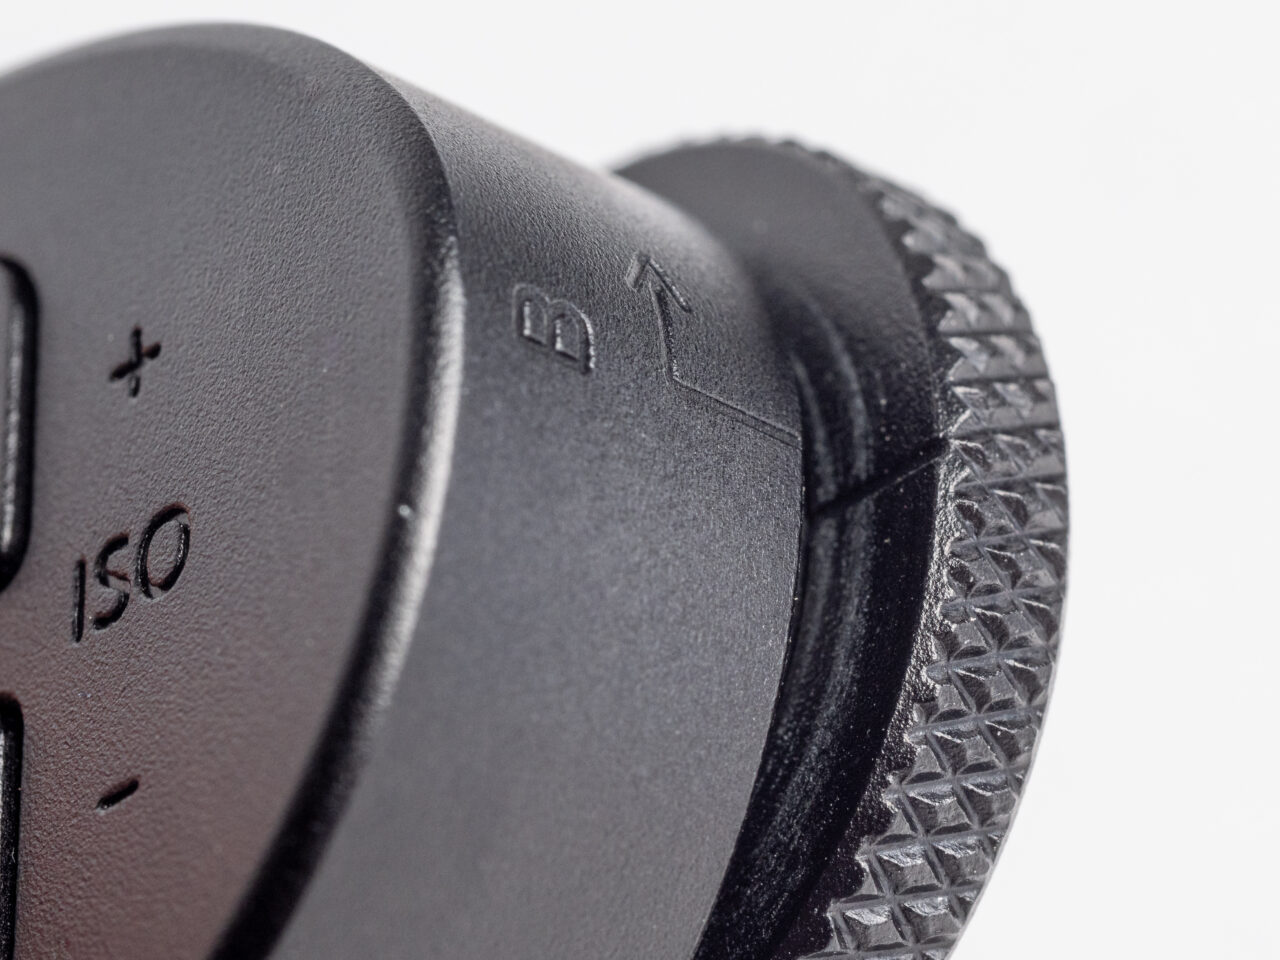
- On the end of the meter, find an engraved line with an arrow pointed right, and the letter B
- Turn the coupling dial until an engraved line on it aligns with the line on the housing. This is the B (Bulb) position.
- Lift up on the dial and you’ll find that it can compress up towards the housing.
- Turn the dial a little bit farther to the right (counter-clockwise), as indicated by the arrow, and you’ll notice that the coupling dial is now locked in that up position.
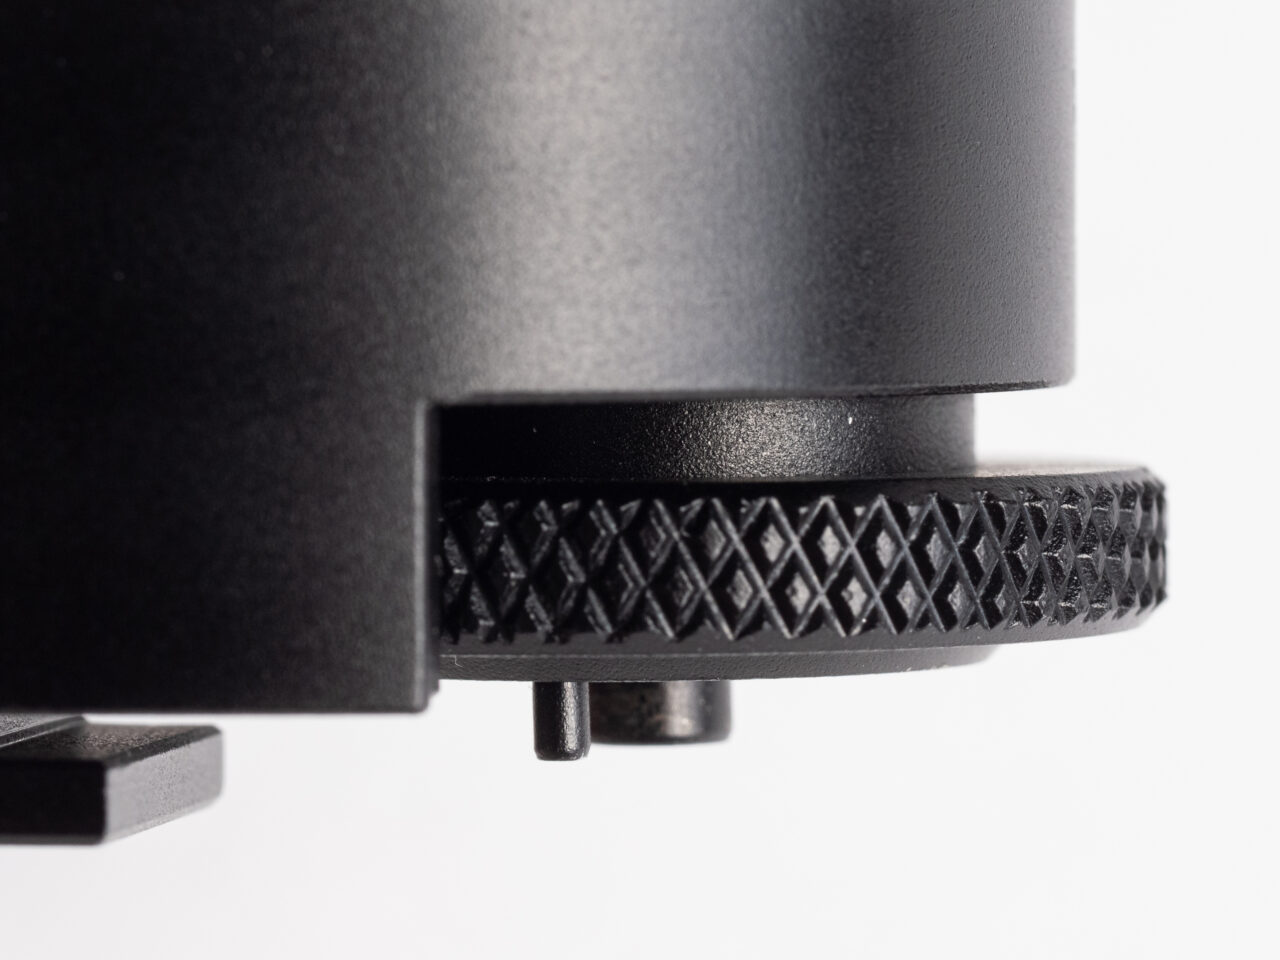
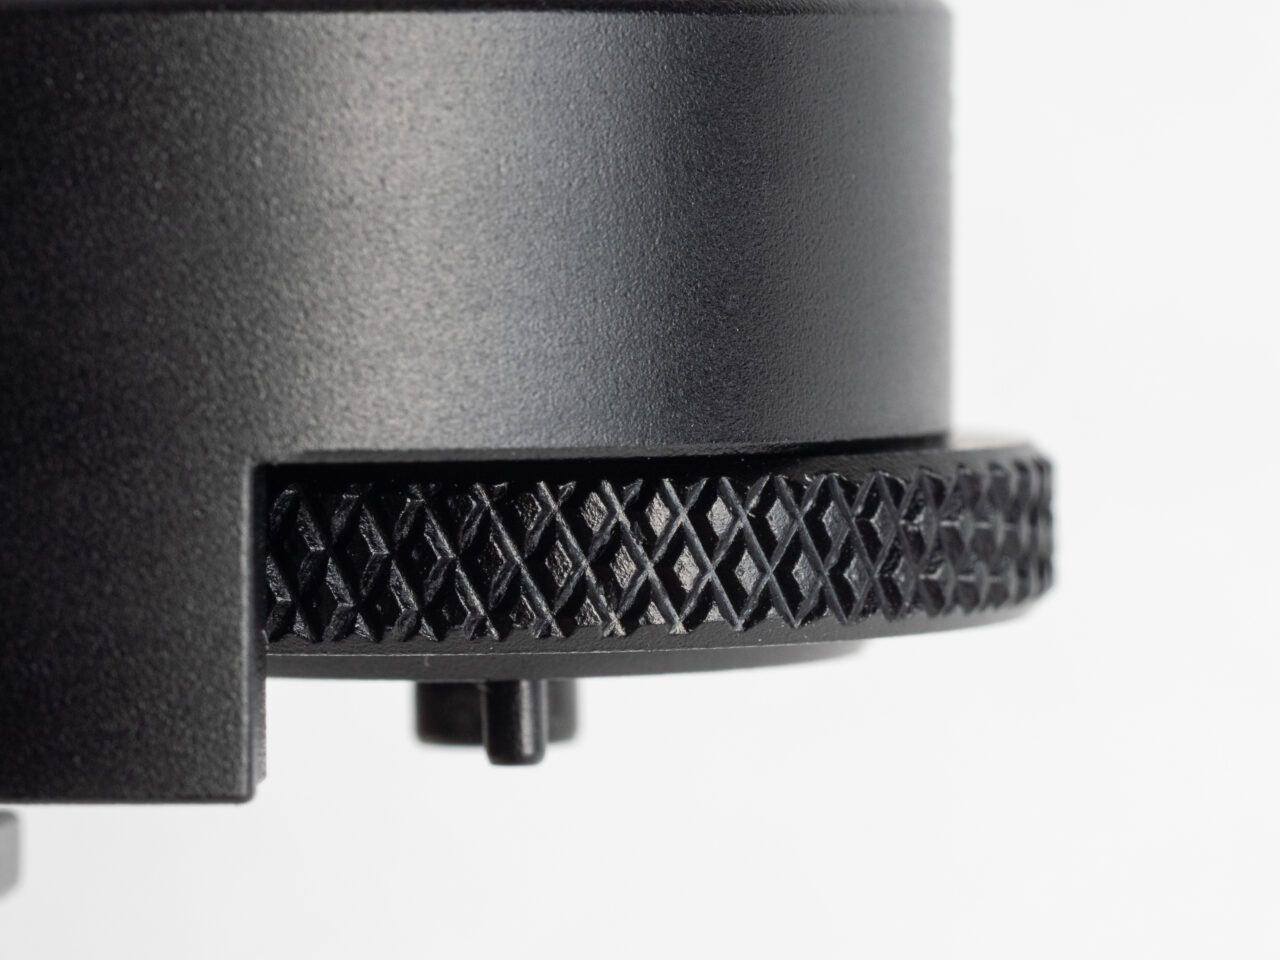
- Set the shutter speed dial on your M to B.
- With the meter’s coupling dial still locked in the up position, slide the meter in the accessory shoe as far as it goes.
- Turn the meter’s coupling dial a little to the left (clockwise) until a spring clicks the dial back down.
- Wiggle the meter a little until you verify that the pin on the coupling dial fully seats into the slot on the M.
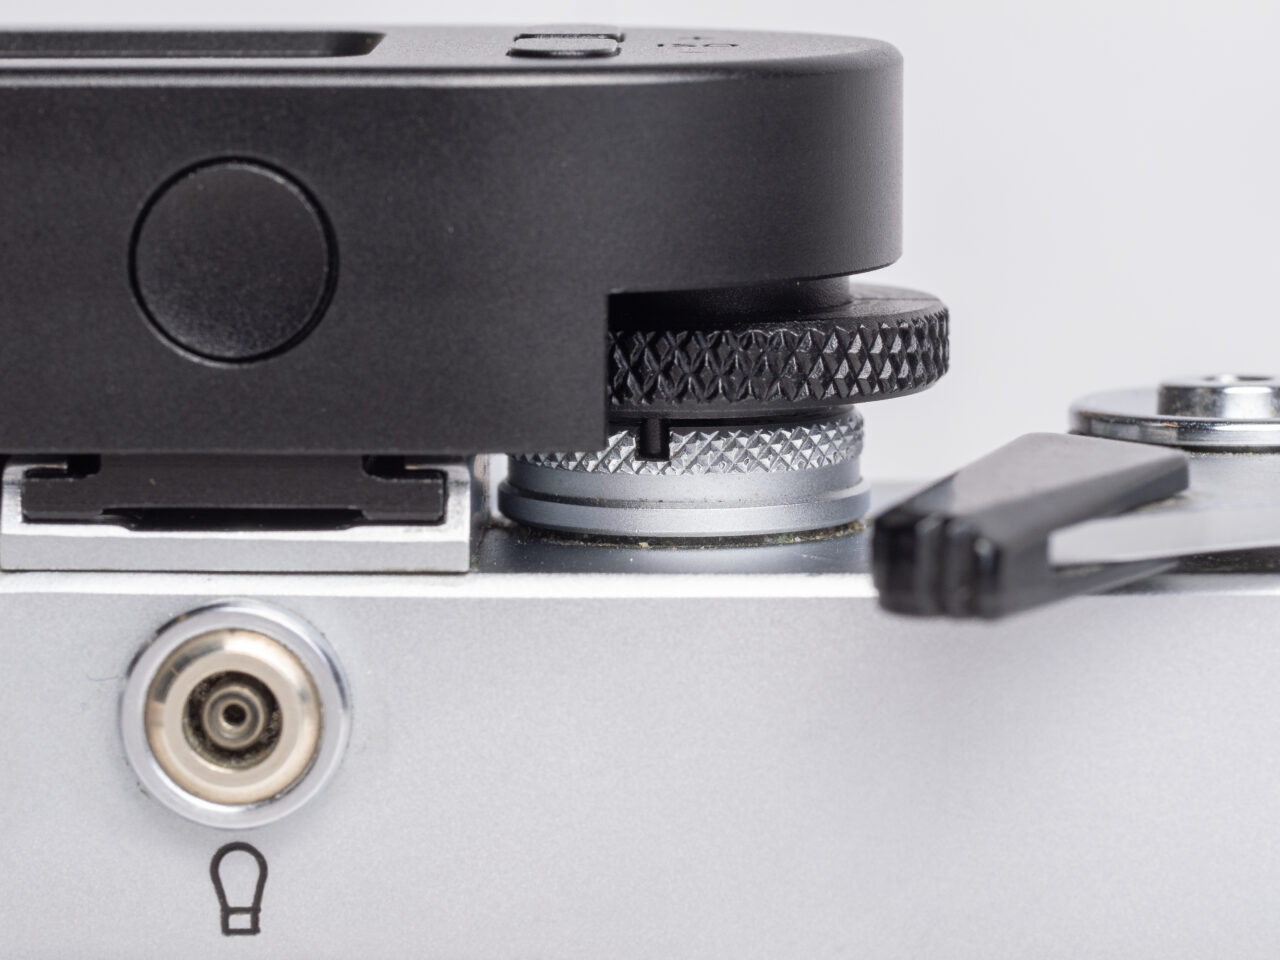
That’s it. You’re almost ready to roll.
Pro tip: if your M-meter is binding a bit during parts of the shutter dial or is difficult to seat, try using a 1.5mm hex key and loosen the three screws that hold the foot on. They have a little play and can be adjusted a bit to smooth things out.
Calibration
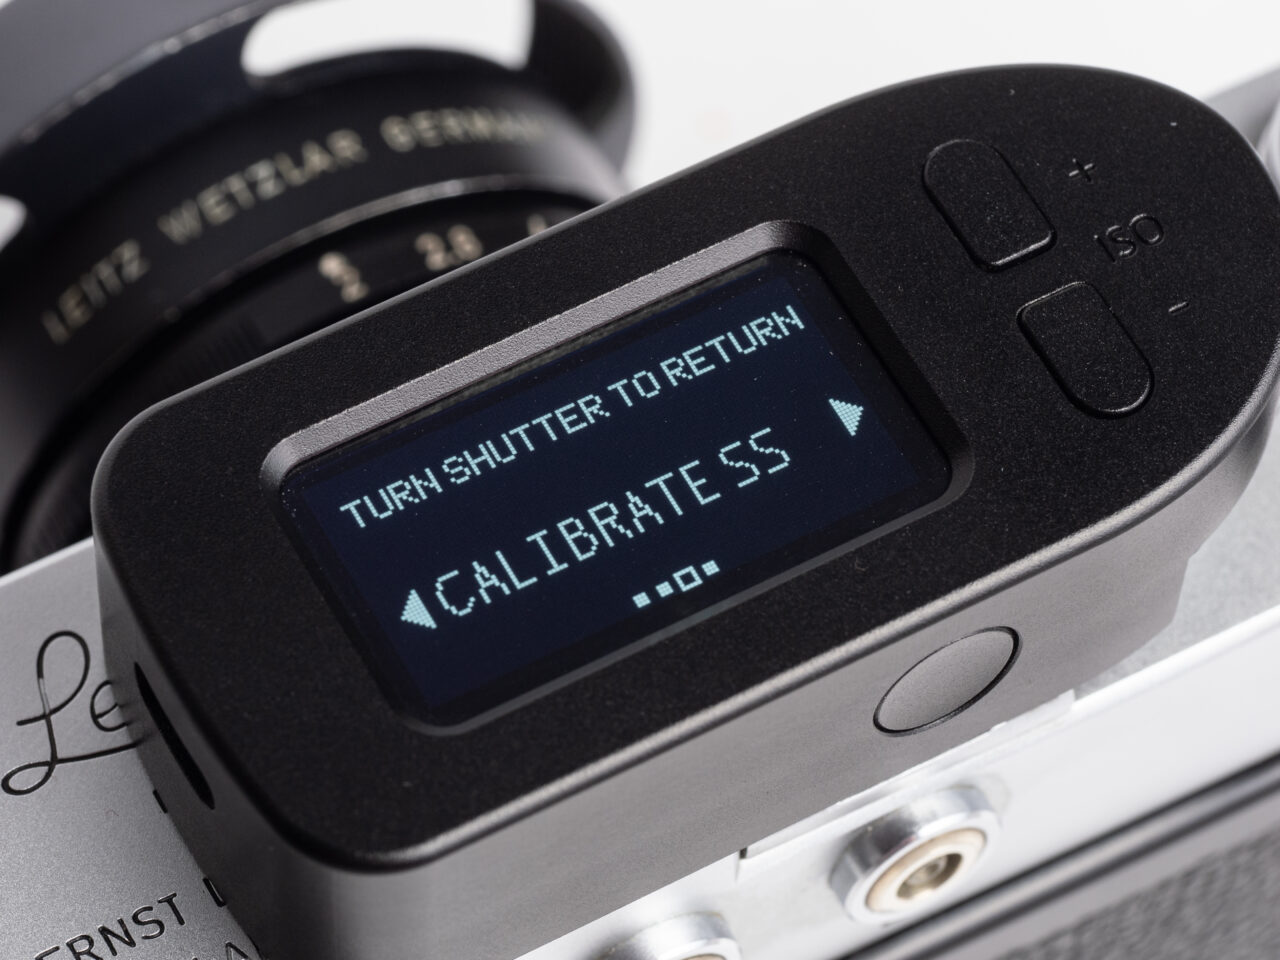
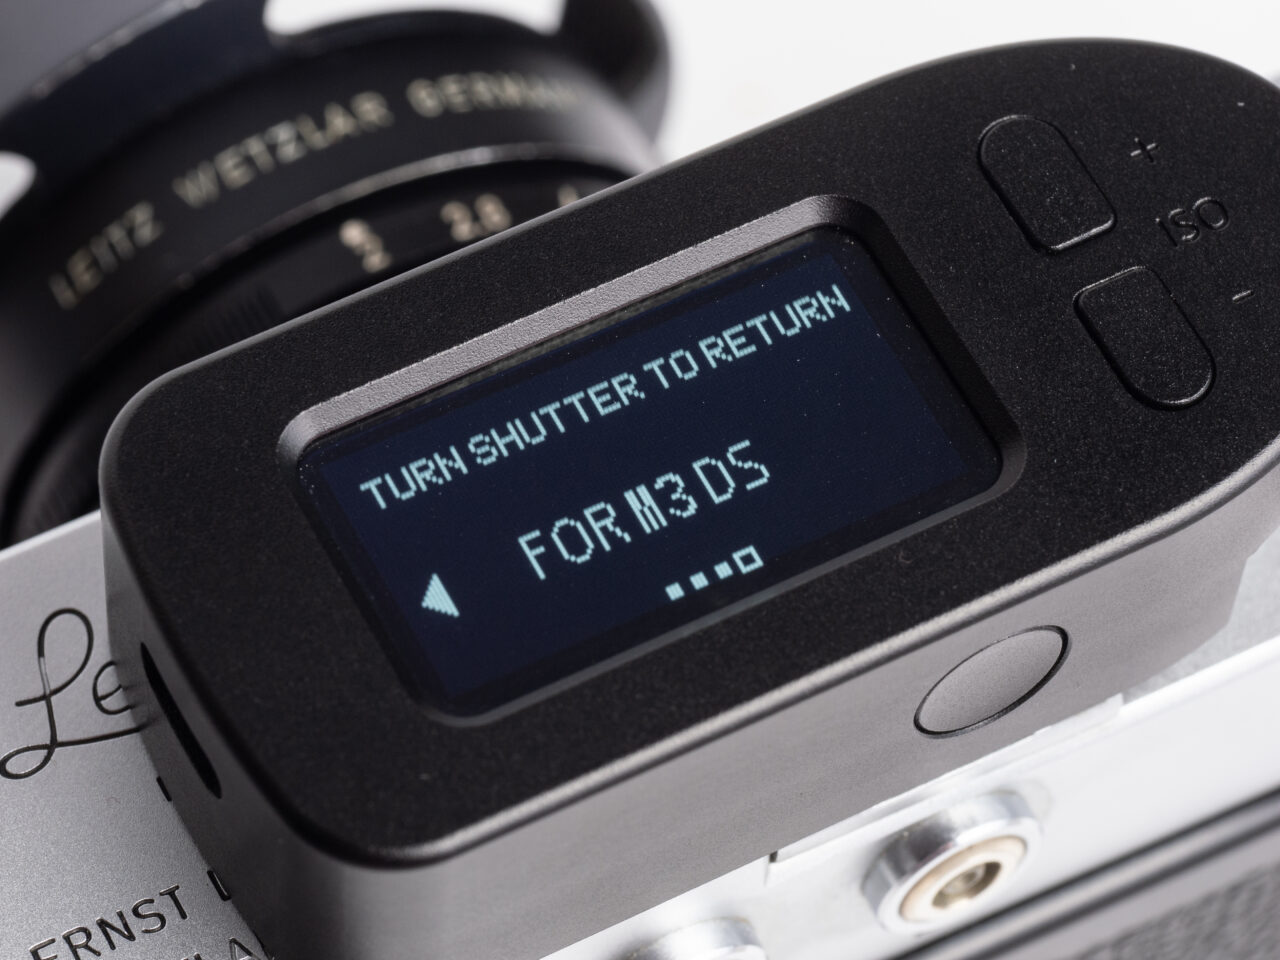
But, before you get metering, we need to do one more thing. KEKS has made it so that the M-meter can be calibrated precisely to your M’s shutter speed dial, and in my experience doing this first thing greatly improves the accuracy of the shutter selection display.
- Enter the KEKS M-meter menus by pressing and holding the ISO – button (on top) and the meter/power button (on back) until the menu activates.
- Press the ISO + button four times to cycle to “RESET” and then press the meter/power button to enter the RESET options.
- If you are using an M model with the shutter progression B-1-2-4-8-15-30-50-60-125-250-500-1000, press the ISO + button two times to select ‘CALIBRATE SS.’
- If you’re using an M3 Dual-Stroke with the different shutter progression of B-1-2-5-10-25-50-100-250-500-1000, press the ISO + button three times to select “FORM3DS” instead
- You will now need to tell the meter where each of your shutter speeds are. Starting with B, because you’re already on it.
- Press the meter/power button to register the location of B
- The meter will ask you to confirm, press meter/power a second time to do so.
- Press the ISO + button to select the next shutter speed.
- Turn the shutter speed dial one click to the left/clockwise to select the next speed.
- Press the meter/power button to register the location and again to confirm.
- Repeat steps 7-9 for all other shutter speeds, paying careful attention to the shorter dial distances of 1/30, 1/50, and 1/60 (if you have those.)
- Once 1/1000 has been registered, push ISO + one more time to get the final registration screen.
- Press meter/power one last time to save the settings.
Menus
Now you’re ready to go. Feel free to dig around more in the menus if you want, there are some choices you can make in there for how you want to work:
- COMPENSATION
- Set exposure compensation in 1/3 steps up to +3 or -3EV
- Aperture
- Aperture Stops
- Thirds
- Halves
- Full
- Max Aperture
- F1
- F1.4
- F2
- F2.8
- F4
- F5.6
- F8
- Min Aperture
- F128
- F90
- F64
- F45
- F32
- F22
- F16
- Aperture Stops
- ISO
- Thirds
- Halves
- Full
- DISPLAY
- BRIGHTNESS
- 25%
- 50%
- 75%
- 100%
- Auto
- REST TIME
- 15s
- 30s
- 45s
- 60s
- 120s
- 180s
- 240s
- 300s
- OFF (in this mode the display stays on forever until you press and hold the power/meter button to turn the meter off yourself)
- BRIGHTNESS
Note: when navigating the menus, use the ISO +/- buttons to change options, meter/power to select an option, and turn the shutter speed dial one click either direction to go back one level or exit entirely.
OK. But, how do you actually, you know… meter with it?
Use the ISO +/- buttons to set the ISO you’re shooting at. Short press the meter/power button to wake the meter up or take a single reading. Double-press the meter/power button to enter continuous metering mode (a C will appear on the display, press the meter/power button again to lock a single reading and exit Continuous). It’s pretty straightforward.
The meter itself
The KEKS M-Meter is a very close clone of the M meters of old. It’s actually a little bit smaller, and it’s lighter too. The area formerly filled with stripes and dials is cleaner and occupied by a single large OLED display. The OLED is bright enough to be visible in sunlight, and the dimming options keep it from blinding in low light. In addition to the selected shutter and metered aperture, the KEKS also always shows the EV reading, which even the original Leica ones did not do. EV has fallen out of fashion as a metering convention, but, for those of us versed in it it’s still an excellent and quick way to double-check if the calculated exposure seems to match the light in the scene, and I find it a very welcome addition.
The KEKS M-meter uses the Vishay VEML7700 ambient light sensor, which is a quality sensor and well-chosen for this purpose. You can review the full tech sheet as well as the implementation sheet, if you want to really nerd out. To just call out some relevant details though, this ambient light sensor natively outputs readings in lux, has a spectral frequency response designed to closely match that of the human eye, and has a pretty good response range over a wide-angle of coverage (still managing 50% relative sensitivity at 80º!) As KEKS has implemented it, there’s a little physical aperture over the metering cell that limits the angle of view to 30º. Within this 30º view, the metering is just very slightly center-weighted, dipping only to 85% sensitivity out at the edges.

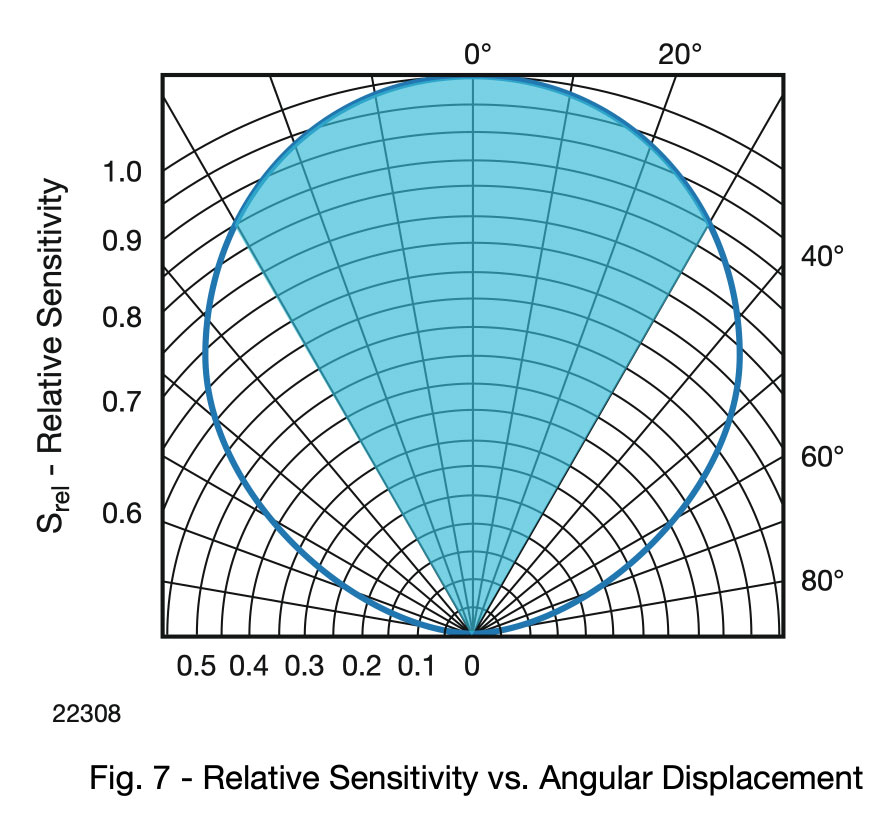
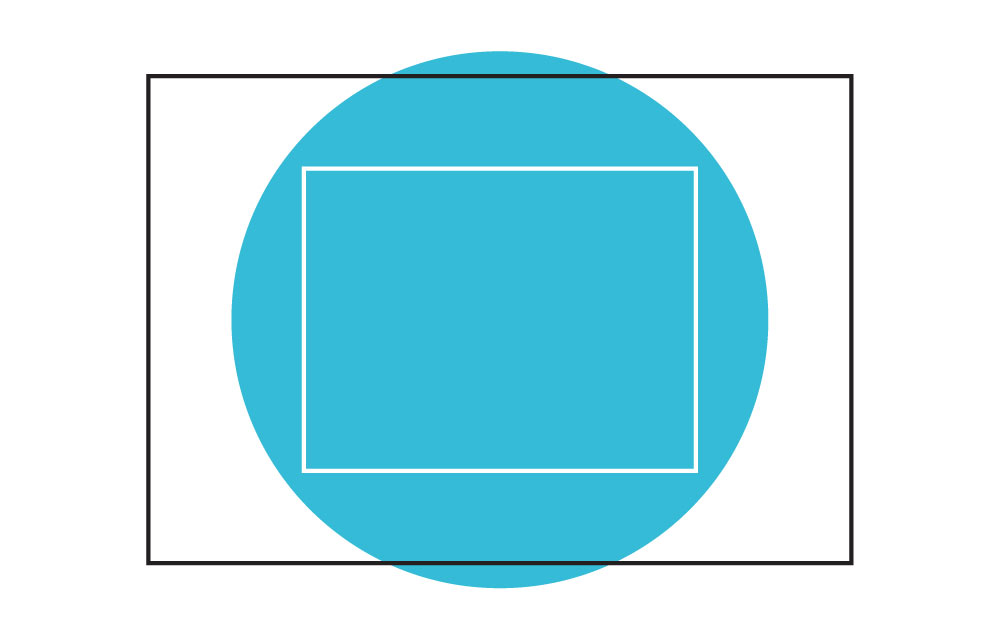
A 30º cone is roughly equal to the vertical field of view of a 50mm lens (27º) and the 50mm frame lines can be pulled up regardless of what lens is mounted and used to gauge what part of the scene you’re metering.
30º also is not very different than the 27º of the original Leica M Meter, which suggested the use of the 90mm frame lines instead. KEKS itself recommends using the 50mm frame lines. The discrepancy, I think, is down to whether you’re using the diagonal (in which case you want the 90mm) or the vertical (in which case, the 50mm) of the lens area. I can confirm through testing that overhead lights in dim spaces—truly one of the great scourges of most meters and a source of many mis-metered scenes— can be right up against the top of the 50mm frame lines before it changes the metering. So, in general scenes the 90mm frame lines will give a good idea of what you’re metering for semi-spot work, but indoors or with any bright lights anywhere on the edges of the frame I recommend using the 50mm frame lines to be sure you’re not contaminating the reading with those brighter lights.
I have not found the KEKS M-Meter, when used with those considerations for its metering cone, to provide anything other than precise and accurate readings. Nor would I have expected it to. KEKS chose a good sensor and they’ve implemented it very well.
The meter also wakes up to do its job extremely fast. If you’ve used older digital meters that take a moment or two to drag themselves out of their slumber, you’ll be delighted by how the KEKS M-meter instead is nearly instantaneous. This does, however, lead to one of the very few issues I’ve had with it: often (but not always) the first metering upon waking up is way off. I think the meter is actually trying to pull the reading faster than the VEML7700 can actually exit stand-by mode (yes, I read the nerdy tech sheet.) This is not a big deal, a quick second press will return an accurate reading and can still be done faster than most other meters can even turn on. Still, it’s helpful to be aware of.
And, since I’m talking about the few issues I’ve had, I may as well mention the others here. One is fairly notable, the other two are incredibly minor.
Notable issue: Since the KEKS M-Meter is obviously all-digital, and does not have the slide-rule dials of the vintage inspiration, it uh… also does not show you what shutter speed you left the camera set to if the display is off. The keen observers among you probably already figured this one out. Coming from an actual MR meter this has been a very minor nuisance for me. Mostly it doesn’t matter, the meter wakes up very fast and it does actually track any changes you made to the shutter speed while off. But it does mean I have to remember to wake the meter up if I’ve forgotten what shutter speed I left the camera at.
Minor issues: in addition to the already-mentioned first reading thing, the OLED display is one of those ones that’s polarized in exactly the right way to appear to be dead if you’re wearing polarized sunglasses, and, the time I tried using a high-output 20w USB-C charger the meter got weird and kept continuously draining down within three hours even when not on. Just remember to lift your sunglasses up when metering, and stick to slower 2A chargers (I’ve had zero issues charging it off my MacBook Pro, and a full charge still only takes an hour.)
Conclusions
If you haven’t caught on yet, I think the KEKS M-meter is a great product. I think the market has long needed something like this, and I think KEKS has done an extraordinary job. It has a few small flaws, but, so do the vintage MR meters. And on balance, the KEKS M-meter’s flaws (erroneous wake-up reading, no visible shutter speed when off) are a lot less deal-breakers for most users than the Leica ones would be (hard to find working, likely to break even then, requires the hard-to-find and expensive Wein Cell PX625 with a relatively short operating life). The fact that the KEKS is a newly made product with a built-in rechargeable (and replaceable) battery tilts the balance well in its favor even before adding in the digital readout, customizable settings, highly-accurate light sensor, and the lack of need to switch back and forth between two metering ranges.
If you’re one of the lucky chosen ones with an M that can mount it, the KEKS M-Meter is the new gold-standard for meters for the Leica.
What’s Good:
- Built-in rechargeable, replaceable battery
- Highly accurate, well-implemented analog light sensor
- OLED display visible even in bright light, dims enough to not startle in low-light
- Shutter-coupled with calibration
- Lighter than the original MR meters
- Very clean and elegant, looks good mounted on the camera
- Extremely fast wake-up times
- Good customization
What I Like Less:
- Fast wake-up leads to frequent misreadings on first metering
- Shutter speed no longer always visible
- Screen blacks out when wearing some polarized sunglasses
- Doesn’t like being used on high-output rapid chargers
As of the time of this writing the KEKS M-Meter will be available in silver or black chrome with aluminum housings for $120 USD. A black enamel version with a brass housing is also available for $140 USD. Considering the MR-4 will run around $160 for one that might still work, the KEKS M-meter is one of the easiest recommendations I can make for most Leica M shooters. If you can manage to find one in stock.